Since we will be working a lot with Videos when working on computer vision, it makes sense to understand some video basics.
Somethings like:
1. What are videos
2. How to load and run videos
3. How to find values for fps, video frames, duration of video
4. How to put text on videos
5. How to draw shapes on videos
6. How to start a video on a particular position (time)
We shall need to know more about the videos, but for now we can start with these.
As always, what’s the better way to learn these than write a few lines of code.
Download code here Video Basics
First answering what exactly are videos. Videos are nothing but an illusion of motion created by showing images in quick successions. Videos are composed of multiple image frames.
Now starting with the code:
import cv2
import numpy as np
In line 1-2 we import the packages that we shall be using in the code.
#Define a function that will capture the basic details of the video
def getVideoStats(capture):
	#get frames per seconds (fps) from the video
	fps = capture.get(cv2.CAP_PROP_FPS)
	#total frame counts
	frame_count = int(capture.get(cv2.CAP_PROP_FRAME_COUNT))
	#codec used to capture the video. This is useful when you are saving the
	#video to disc
	codec = capture.get(cv2.CAP_PROP_FOURCC)
	#total duraiton of video in seconds
	durationSec = frame_count/fps
	print ("Total time: {} FrameRate: {} FrameCount: {}".format(durationSec, fps, frame_count))
	return (fps,frame_count,durationSec)
On line 6 we define a function that takes an input as video capture stream. Then on line 8, 10 and 13 we capture various attributes of the video namely, frames per second (fps), total number of frames in the video and codec used to encode the video we are playing. On line number 15 we calculate the total duration of video by using the 2 attributes (total number of frames and frames per second)
# set the start time for the video. In this case we start from 2 seconds
#set function takes time in milliseconds. This obviously will not work in
# case of camera stream 🙂
capture.set(cv2.CAP_PROP_POS_MSEC,2000)

#read the current frame from the video
# Videos are nothing but a sequence of image frames
ret, currentframe = capture.read()
On line 32 we set the start time for the video. By default video stream start from beginning however at times we need to process the video from a particular position, so we can use this function to do the same. In the current case we start from 2 second onwards. “set” function takes input time in milliseconds. Setting start time for video play will obviously not work in case of capturing video from live camera stream 🙂
#read the current frame from the video
# Videos are nothing but a sequence of image frames
ret, currentframe = capture.read()
Then on line 36 we read the video stream to get the initial frame.
#get the height and width of the video frame
width = capture.get(cv2.CAP_PROP_FRAME_WIDTH)
height = capture.get(cv2.CAP_PROP_FRAME_HEIGHT)
print ("Total Height: {} Width: {}".format(height, width))
#you cn also get the same thing by finding the shape of numpy array
#remember OpenCV represents images as numpy arrays internally
print ("Total Height: {} Width: {}".format(currentframe.shape[0], currentframe.shape[1]))
Then again on line 39 and 40 we use the get function to retrieve the value of frame width and height respectively. Also we can get the same values by finding the shape of numpy array, remember OpenCV represents images as numpy arrays internally
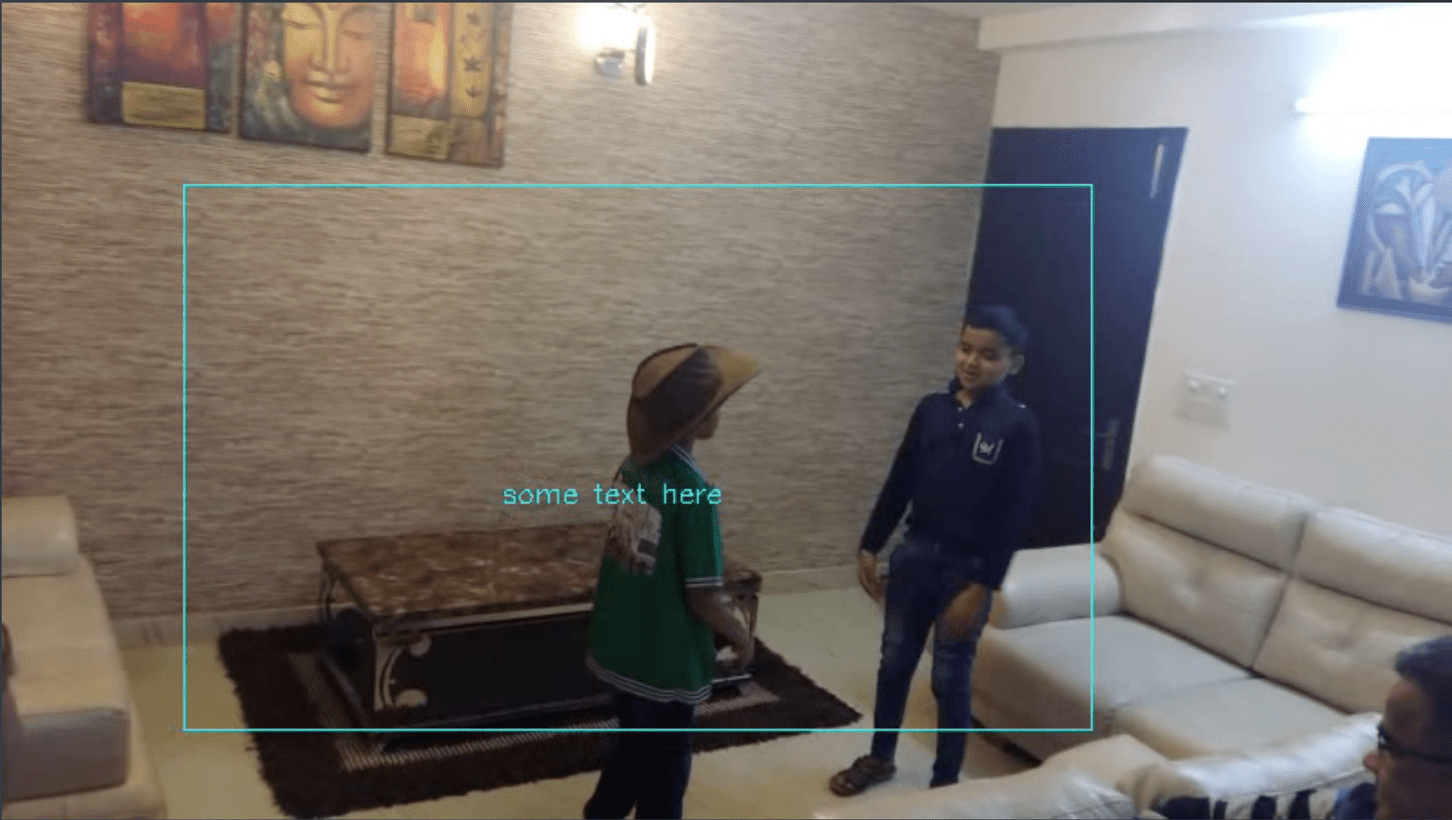
while(True):

	ret, currentframe = capture.read()
	#the colour we use to display text etc on video
	# remember openCv works in BGR format
	color = (255,255,0)

	#remember OpenCV start from top left corner as 0,0 and increases x on right
	# and y coordinate going down
	#intialise x, y coordinate
	x = 100
	y = 100
	#intialise width and height
	x_plus_w = 600
	y_plus_h = 400
On lines 49 till 63, we start an infinite while loop to loop through all the frames of the video, then we start reading the next frames of the video. Then on line 54 we initialize the color we shall use to display text etc on the video. Always remember OpenCV works in BGR format (not RGB)
We then initialize the coordinates where we shall display the text and rectangle on the video.
Again remember OpenCV starts the coordinate system from top left corner as 0,0 and increases x on right and y coordinate going down
	#Draw rectangle on the frame
	cv2.rectangle(currentframe, (x,y), (x_plus_w,y_plus_h), color, 1)
	label = "some text here"
	#write text on the frame
	cv2.putText(currentframe, label, (x + i,y + i), cv2.FONT_HERSHEY_SIMPLEX, 0.5, color, 1)

	#Display the current frame of the video
	cv2.imshow('frame',currentframe)

	#quit on click of 'q'
	if cv2.waitKey(1) & 0xFF == ord('q'):
		break
	i = i + 1
	if i == 300:
		i = 0

#Clean up
cv2.destroyAllWindows()
We then draw a rectangle on the video frame using cv2.rectangle function, it takes (starting) top left x,y coordinates, (ending) bottom right x,y coordinates, color in which to display rectangle and thickness of the line (in number of pixels) as inputs. Similarly on line 69 we write text on current frame of the video. Then on line 72 we use cv2.imshow to display the current frame of the video.
Download code here Video Basics
In case you have any questions / comments feel free to comment here.